There's so many ways to create online forms, it can be overwhelming to pick the perfect one for your needs. Arguably the most powerful is one you already have access to for free—it's part of Google Drive. Drive is an integral part of every Google account, and is best known as a cloud storage service and for its Docs office suite. One of its lesser known features is Forms, a survey building tool that is as simple or as complex as you need it to be. Whether you're collecting email addresses, running snap polls on your website, or are building an in-depth customer service survey, Forms is the ideal tool to use.
In this tutorial, I will show you how to get started with Google Docs Forms. I'll explain the different types of questions you can create with it, how you can make the questions vary depending on the responses the user provides, and finally how you can access and analyse the data you receive. Let's get started.
Getting Started
In your web browser, go to drive.google.com and login to your Google account if you haven't already done so. In the top left corner of the screen click Create and select Form.
 Locate the Forms option in the top left corner of the screen
A new tab will open in your browser, in which you will create your form. First, enter a title for your form and choose a template. If you find a template you like then click on it and click OK, however the Default theme is suitably neutral if you're planning to embed your survey into your website. Click OK to continue.
 There are some pre-designed templates that you can use
You're now at the main Form page, and you can work through this in the order the items are listed.
First, Form Settings. If your form is going to be two or more pages long then tick the box labelled Show progress bar... to show the respondent how long it will take them to fill out the survey.
The next section is bulk of the survey. It's split into pages, but obviously to begin you'll only have one page. The title of the form and its description are at the top—click on either to add or edit them.
Now you are ready to add your first question. Click in the Question Title box to add your question, and add any Help Text if the question needs explaining.
Choose the type of question you want to ask by clicking the drop down box. A multiple choice question is set up by default, but there are nine different kinds of input you can request. We'll take a look at six of them.
 The Form page is ordered by the sections you need to edit
Types of Question
Text
This requests very short text input from the user, such as their name or email address. To ensure they enter a valid email address click Advanced Settings. Tick Data validation and choose Text in the first box and Email address in the second. In the Custom error text box type "Please enter a valid email address".
 Add data validation to your text questions
Paragraph Text
This requests a longer response, such as for general comments or feedback.
Multiple Choice
This provides a list of answers, and the user can select only one. Add your first answer in the box labelled Option 1, then click in the next box to add the second answer and so on. You can also click Add "Other" to add a small text box at the end of the list. The user can add their own choice of answer here.
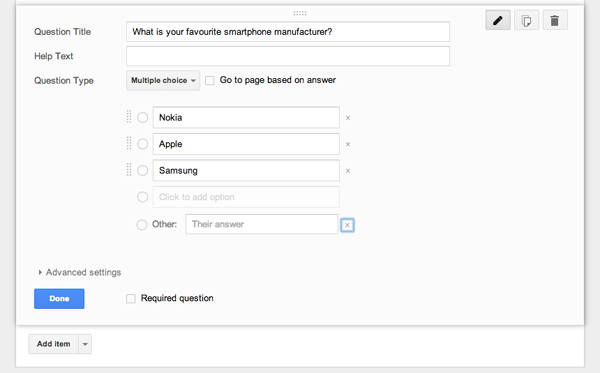 Multiple choice options in a Google form
Checkboxes
This is another multiple choice list, only this time the user can select more than one answer. As with the Multiple Choice question, type in your list of answers and use the Add "Other" option as well if you need to. You can specify the minimum, maximum or exact number of answers the user must tick by using the Data Validation option in Advanced Settings.
 Choose how you want to validate your answers
Choose From a List
This is a multiple choice style question presented in the form of a drop down list. The user can only choose one answer, and cannot add their own choice. It's good for absolutes, such as Male or Female, rather than opinion-based questions.
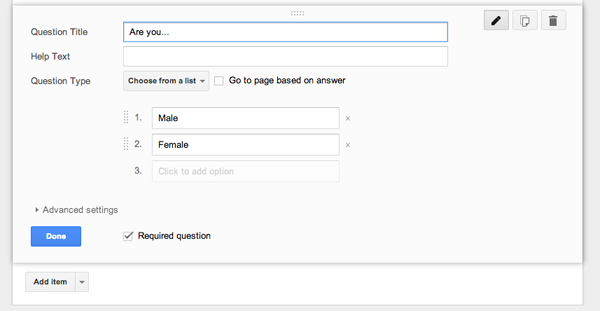 List questions in a survey
Scale
Scale asks the respondent to rank things on a scale of, by default, one to five. You should provide labels for the lowest and highest scores on the scale for guidance. An example question might be "How satisfied were you with the service you received?". The label for a score of 1 would be "Very unsatisfied" and 5 would be "Very satisfied".
The Scale option lends itself to multiple questions, but you can only add one at a time. Create multiple questions quickly by clicking the Duplicate button, then rewriting the Question Title in the copy.
 Add a scale to questions where there's no absolute perfect answer
Adding More Questions
When you have finished writing each question click Done to add it. Then click Add item to start another question, choosing the question type from the list.
Add item also enables you to add a new section (Section Header). This helps you organise a longer survey. At the very least it's a good idea to have personal information questions grouped into their own "About you" section. You can also add a Page break to split longer surveys across multiple pages.
 Add new sections to make the survey easier to follow
Creating Dynamic Forms
Page breaks are also useful for building more dynamic surveys that will show different questions based on the user's replies.
Here's an example: you're creating a technology survey asking people about their usage of smartphones and tablets. You can make this as relevant as possible by splitting the questions over five pages.
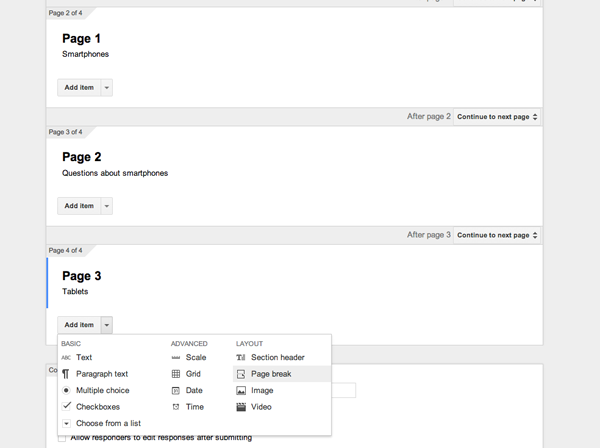 Use multiple pages to create more dynamic forms
Page 1 contains the multiple choice question "Do you own a smartphone?". Option 1 is Yes; Option 2 is No. Tick the box labelled Go to page based on answer, then for option 2 select Go to page 3.
 You can send users to a particular page based on their response
Page 2 contains your questions about smartphones.
Page 3 has the multiple choice question "Do you own a tablet?". Again, Option 1 is Yes; Option 2 is No. Tick the box labelled Go to page based on answer, and for option 2 select Go to page 5.
Page 4 contains your questions about tablets.
Page 5 contains your About You demographics questions.
In this example, if someone answers Yes to the question on Page 1 it will take them to the Smartphone questions on Page 2, which will in turn lead on to Page 3.
If they answer No on Page 1 it will skip the smartphone questions and go straight to the tablet question on Page 3. Answering Yes to that will show Page 4 and the tablet-specific questions; answering No will jump to Page 5 and the About you questions.
This method ensures your survey remains relevant to the participant, and helps maintain the integrity of the data you receive in the process.
Finishing Up
Re-order your questions, sections and pages by hovering your mouse over them and dragging them into place. Click View live form in the toolbar at the top of the screen to test the form at any time.
 You can test your form as you go along
When you're happy that it all works, edit the Confirmation page in the section at the bottom of the screen. Thank the user for taking part, untick all the boxes and click Send.
 Adding a closing message and actions to your form
You will now see a window giving you a link to share via email or social networks. If you want to put the form on your website click the Embed button. Change the height and width so that the form will fit your web page (the width is the most important), then copy the embed code and paste it onto your website.
 Resize your survey to fit it into your web page
Finally, on the toolbar at the top click Choose response destination. The survey data is saved to a spreadsheet, so enter a relevant title then Click Create. Check that the toolbar also says Accepting responses—if it does your survey is live.
Getting the Results
You can check the results at any time. Open the Form from your Drive account. In the menubar at the top you will see a number next to Responses. This is the number of people who have filled in your form.
 Tweaking your Survey once it's finished
Go to Responses > Summary of responses to view all the data displayed in easy to read charts and graphs.
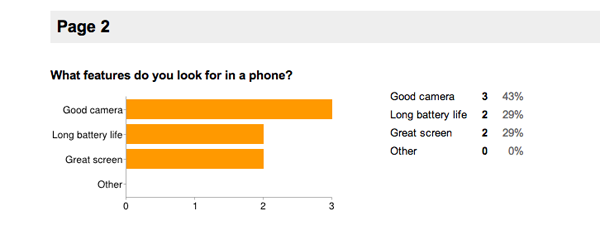 Results from your survey
Alternatively, click View responses to see all the raw data saved in a spreadsheet. It's best not to edit that spreadsheet directly, but you can copy and paste the data into another spreadsheet or other document for further analysis.
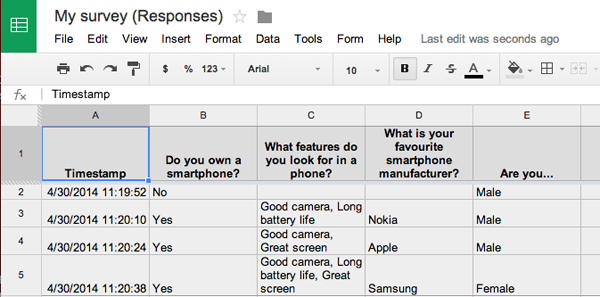 You can also see all the results detailed in a spreadsheet
When you have received enough responses you can close the survey down. Click Accepting Responses and it will change to Not accepting responses. You can add brief message indicating that the survey is now closed, and you can, of course, turn the form back on at any time.
Conclusion
The Forms feature in Google Drive is an extremely powerful tool capable of creating the most complex surveys. It's also intuitive enough that if you want to run a quick poll or competition you can throw one together in just five minutes. What lifts it above other survey creation tools is the way it fully integrates with Google Docs and the rest of your Google services. This means you can collaborate with others on creating your surveys, or share the finished product with select people, and then use the power of a spreadsheet to analyze your responses.
Best of all, it is suitable for use in any scenario, just as at home powering a vital customer feedback form for your business as it is sending out your wedding invitations. Give it a try, and let us know in the comments below if you have any trouble with it.
You received this message because you are subscribed to the Google Groups "Keep_Mailing" group.
To unsubscribe from this group and stop receiving emails from it, send an email to keep_mailing+unsubscribe@googlegroups.com.
To post to this group, send email to keep_mailing@googlegroups.com.
Visit this group at http://groups.google.com/group/keep_mailing.
To view this discussion on the web visit https://groups.google.com/d/msgid/keep_mailing/CAG%3DbiTvR30hd0-NDfN_D5TWtPRBCt-2-HjppNfW49Uuk%3DMn9WA%40mail.gmail.com.
For more options, visit https://groups.google.com/d/optout.
No comments:
Post a Comment